CALCULATING
OVERSIZE THREADING ALLOWANCES
Many
people believe that to calculate the increase required for surface
coatings, one must add the actual thickness of the coating to
the component dimensions. This is not the case.
This assumption is fine in the case of plain bar, where the
physical increase is measurable in vertical and horizontal planes.
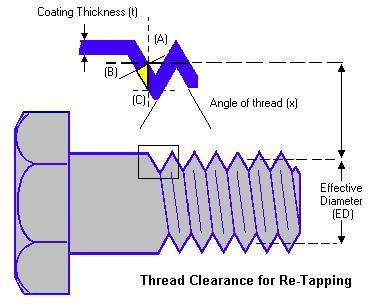
With threaded components the additional coating is applied to
the threads at an angle, hence the resulting increase upon the
"effective diameter" is greater than the increase
upon the plain shank in terms of the engagement with the nuts.
It
is necessary for Commercial Fasteners to be interchangeable
throughout the World, so manufacturers have adopted universal
standards to ensure dimensional compatibility.
Screw
thread measurement is based upon a theoretical dimension known
as the "Effective Diameter". Although there are still
many different thread forms in use today, this system is used
in virtually all instances. The Effective Diameter (ED) is a
measurement taken from an axis drawn horizontally, at approximately
half of the total thread height, to a mirror image position,
diametrically opposite (See figure). The same designation is
applied to both internal and external threads.
Manufacturing
standards have been created around this method based on the
"Nominal" or ideal dimension in each case, and are
based upon these standards, from which the allowance for oversize
tapping is derived.
In
most cases, the Male fastener is assumed to be manufatured to
nominal dimensions before coating applied. However, some manufacturers
choose to reduce the effective diameter of the bolts by "underscrewing"
the threads. With hot dip galvanising however, a re-tapping
operation is still necessary because the threads of the nuts
still tend to fill up when coated. Oversize tapping is the more
widely adopted solution as in this case the original integrity
of the male fastener is not compromised with a view to Tensile
Strength
